
The Sovereignty of the Ledger: Why I Run My Own Nodes
In 2026, centralized crypto exchanges (CEXs) are still thriving, which tells me that convenience remains the ultimate trap. For most, the process is always the same: hand over your KYC data, install an app, and buy “virtual” currency. Many people feel they own their assets because they see a balance on a screen, but the reality is simpler: if you have to ask for permission to withdraw or transfer funds, you are not a holder; you are a creditor.
I strongly believe most people have never actually read the original Bitcoin whitepaper. If they had, they would realize that the entire purpose was to remove the middleman.
My Real Reason for Using Crypto
Most people enter the crypto space just to make money. It’s human nature; there will always be that hidden hope that a token will hand you a small fortune. That is a feeling I still have to fight against myself. I have been actively involved in projects where I held stakes in their tokens with high hopes, only to watch them fail and those dreams evaporate. Fortunately, my actual income in this space came from technical consulting, not speculation.
Over the last few years, my entire framework has changed. As my focus shifted toward building a sovereign life with privacy at the core, I realized the only real reason I still bother with crypto, and it is a very simple one: it is a hard hedge against the collapse of fiat currencies and the traditional financial system.
If a major economic event happens tomorrow, or if for any reason I suddenly lose access to the banking grid, my self-custodied crypto is the one asset no one can freeze, seize, or take away from me. It ensures I can continue transacting in the real world on my own terms. In my experience, this censorship resistance is the ultimate power crypto provides to a sovereign individual.
The Lesson of the “Trusted” Third Party
I have spent years working within startups, including smaller-scale centralized exchanges and crypto firms. I saw firsthand the structural vulnerabilities and the “tricks” used to manage user liquidity. We have all seen the scandals, with FTX being the most high-profile where thousands of people lost everything because they trusted a company to hold their digital keys.
In my experience, especially with the tightening regulations and global control we see in 2026, the only real solution is to own my keys. This way I am the only one who should authorize a transaction.
My Choice: BTC & XMR
I have decided to focus my trust and my capital on only two projects:
- Bitcoin (BTC): The original, heavily-backed digital asset. I use it mostly as a store of value.
- Monero (XMR): The long-proven solution for privacy. I use it as my digital “cash” for everyday privacy.
The Missing Link: Owning My Node
Even if I own my keys, I still rely on the network to broadcast my transactions. I have noticed that most people “leak” their privacy here by using public nodes that can log their IP addresses and link them to their wallet addresses.
I decided that for my setup, this wasn’t enough. I wanted to go further and create my own private nodes that connect to the blockchain exclusively via Tor (or I2P optionally). This ensures a completely anonymous, end-to-end execution environment. When I transact, my home IP isn’t broadcast to the world. When executed correctly, especially with Monero, anonymity isn’t just a hope; it’s a guarantee.
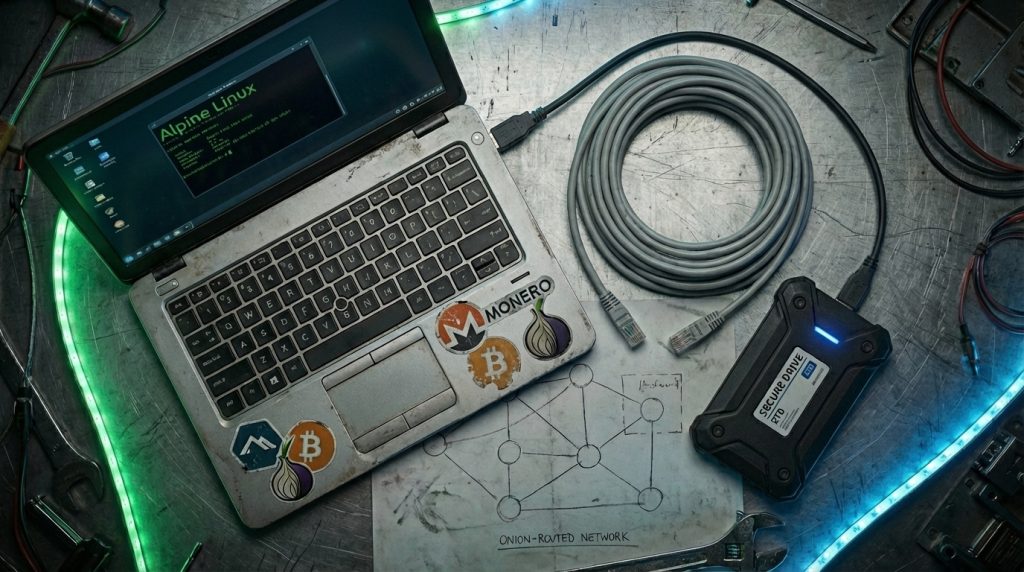
The Build: Re-purposing Hardware
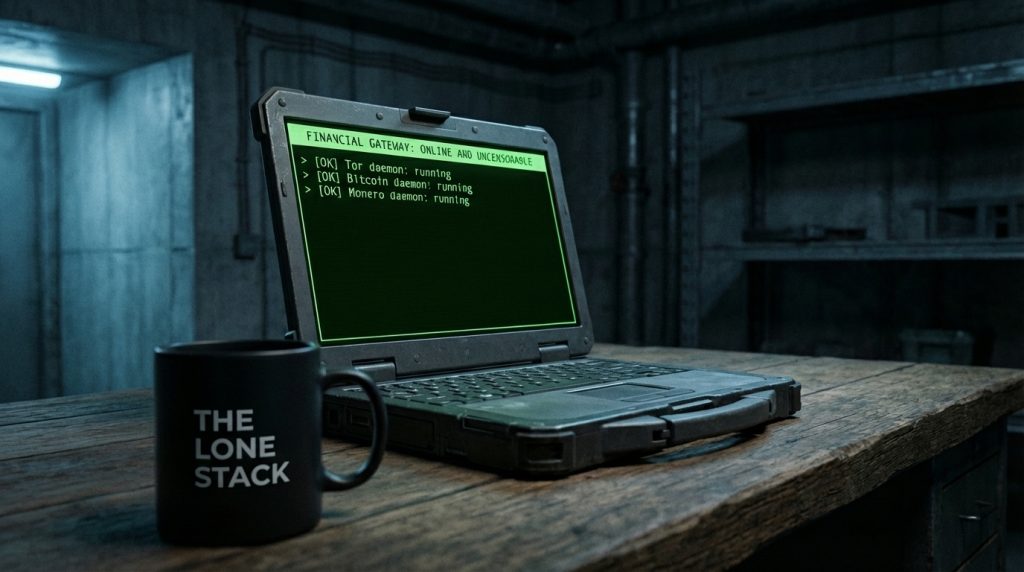
In this guide, I am going to re-purpose an old laptop, the perfect way to give life to “legacy” hardware and transform it into a hardened, sovereign financial gateway.
Full Video Walkthrough
I made a 40-minute video where I walk through everything:
- Why most wallets (even self-custody ones) are still not private
- The official Bitcoin.org and Monero documentation that proves the risks
- The exact “what can go wrong” scenarios
- How I built my own anonymous Tor-only node on old hardware following this full guide.
Watch the full video here:
The Sovereign Inventory
Before I dive into the commands, I need to clarify what I am building. A node is not just software; it is a hardened appliance. By repurposing an old laptop, I gain a “built-in UPS” (the battery), which is a massive advantage for stability, plus an efficient low-powered machine that will not increase the electric bill significantly while it passively syncs with the blockchain networks.
Choosing between a Pruned vs. Full node.
The bitcoind and monerod daemons both support what is known as Pruned mode.
For our scenarios we can choose to run either one or both of bitcoind and monerod from the following modes:
- Full node, this is the default and recommended if you have the disk space, each and every transaction on the blockchain is stored fully in our disk with all the details.
- Pruned node, the entire blockchain is downloaded and every transaction checked, but discard old “witness” or “signature” data from being stored to the hard disk.
When to Choose A Full Node for Bitcoin or Monero?
- You want to contribute to the network by listening on requests via tor and sending blocks to other peers when requested.
- You may import old Bitcoin wallets that will require to scan the entire blockchain to update their balance and history of transactions.
When to Choose A Pruned Node for Bitcoin or Monero?
- You need to save disk space, or your disk space is limited to download the full blockchain.
- You only need this setup running independently for your own wallets with no incoming connections.
- You do not have older Bitcoin wallets to import.
If you have a 2TB SSD, for an old computer, I would recommend Full Nodes. But if you are using an older 512GB or 256GB drive, Pruning is a sovereign move that doesn’t sacrifice your ability to verify your own transactions or your security.
Running a Pruned Node while attempting to import an Bitcoin account (via passphrase) triggers a complete blockchain re-download to find all transactions and build the wallet files.
The Hardware Specs (The 2026 Reality)
We are going to install a really light Linux distribution (Alpine), but the blockchain data requires a lot of space. Running both BTC and XMR securely and efficiently requires the following hardware environment:
- The Machine: An old 64-bit laptop or desktop computer (Intel i3/i5 or equivalent)
- RAM: 8GB Minimum, 16GB Recommended. We need the headroom for the
bitcoindandmonerodcaches. - Storage: Minimum 256GB (Pruned) or 2TB SSD (Full) .
- Bitcoin (Full): ~600GB
- Monero (Full): ~250GB
- Future Buffer: ~1TB
- Networking: Wired ethernet is always preferred over Wi-Fi for 24/7 peer stability.
Synchronization on traditional HDDs is no longer viable due to I/O latency; an SSD is a mission requirement.
The Software Stack
- OS: Alpine Linux. A highly minimal and fully functional distribution, that follows strong security principles and the UNIX philosophy,
libcis replaced bymusl libcand using OpenRC instead of systemd. - Anonymity: Tor (Mandatory). We will configure the bitcoin and monero nodes to communicate only via Tor.
- Validation: Official Bitcoin Core and Monero binaries compiled with
musllibc. - Wallets: For this tutorial I am going to use Sparrow Wallet for Bitcoin and the official Monero GUI Wallet
Check out the link below to see why I chose Alpine Linux and watch a quick installation speedrun.
Installing The Necessary Server Software
There are already pre-built packages for bitcoind and monerod available in the community repository, which is not enabled by default.
Enabling the community repository
Edit as root the file /etc/apk/repositories and you will find the community repository line commented out you will need to uncomment it, your file will look similar to this
#/media/sdb/apks
http://mirror.kku.ac.th/alpine/v3.23/main
http://mirror.kku.ac.th/alpine/v3.23/community
Finalizing the repository configuration requires a package index refresh as root:
apk updateAdding The Packages
Run the following command as root
apk add doas tmux vim nftables nftables-openrc net-tools curl tor tor-openrc torsocks bitcoin bitcoin-openrc monero Now we have everything we need installed.
Configuring doas
On Alpine Linux we are going to use doas instead of sudo as we will need it for running the daemons as a normal user. By default neither of them is installed, this is why the package was included in the last command we run.
To enable root running doas we edit /etc/doas.conf and we make sure the following line exists and it is uncommented
permit persist :wheelAdding a user for Monero
The bitcoin-openrc package adds a script and a user for the bitcoind daemon to run under, the monero package does not. Create the necessary user as root:
adduser -D -h /var/lib/monero -s /sbin/nologin moneroPerforming The Initial Blockchain Download
Before we move to the configuration, we are going to perform an initial sync (download of the blockchain) locally in our disk drive.
High-Velocity Sync Vs. Anonymity Concerns
If we use Tor for downloading ~1TB of data syncing speed will drop, the daemons need to download the data, verify them and store them. This can take days on clearnet (depending on your connection speed), via Tor maybe weeks.
How long does it take to sync the Bitcoin and Monero blockchains in 2026?
In my case with 500Mbit internet speed and a 10+ years old Macbook Pro with its stock 256GB SSD drive and the i7 CPU capped at 2.2Ghz to avoid overheating, Monero sync took ~20 hours, and Bitcoin ~38 hours.
What we need to address is what could be a problem if we sync via the clearnet? Couple of issues here:
- Your public IP is exposed to the network.
- An identity for your node is created and shared with everyone.
- Locally your node create a peers file.
The above last two issues create a scenario that if we just simply switch our node to use Tor after the initial sync, can be used to identify and connect our previously public IP with the onion address.
My protocol involves a “Clean Slate” reset: deleting the peer files before transitioning to Tor ensures the node initializes a fresh anonymous identity while we save in some cases hundreds of hours.
Performing The Sync
We are going to use tmux so we keep the daemons running in the foreground and check their output.
You will need to create different panels on tmux to manage them and see the output. If you are not familiar with tmux you can check the official Getting Started With Tmux page.
I am going to create new directories and save everything under /opt
mkdir -p /opt/bitcoin/data && mkdir -p /opt/monero/data && chown -R bitcoin /opt/bitcoin && chown -R monero /opt/moneroStart the bitcoind sync by running the following command
doas -u bitcoin bitcoind -datadir=/opt/bitcoin/data -prune=50000 -blocksonlyStart the monerod sync by running the following command
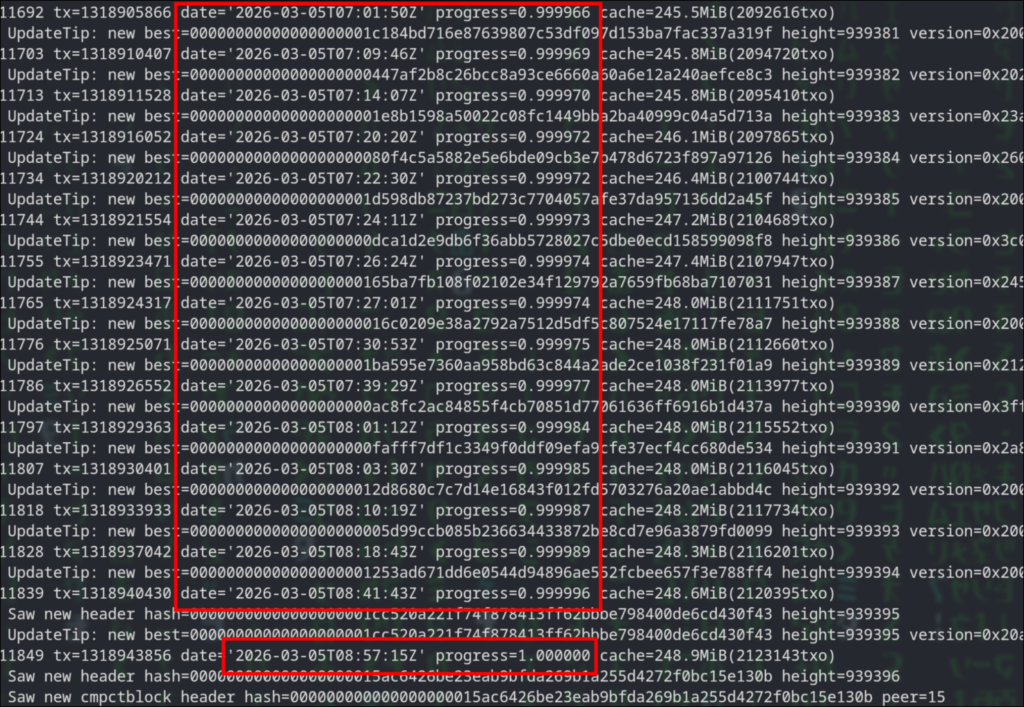
doas -u monero monerod --data-dir=/opt/monero/data --prune-blockchainFor Bitcoin you will know the sync is complete when on bitcoind you will see in the output the “date” to be current and the “progress” to be 1.000000
For Monero you wait till you see the following message

At this point its ok to hit the CTRL + C on the tmux panels to stop each daemon.
Make sure the daemons are fully stopped by running the following command. You should get no output at all.
pgrep -lfa "bitcoind|monerod"Run the following command to remove the files so the node resets on next start.
rm -v /opt/bitcoin/data/peers.dat /opt/bitcoin/data/anchors.dat /opt/bitcoin/data/mempool.dat /opt/monero/data/p2pstate.bin
Fuel the Stack
I write these guides the same way I would help a friend in real life: we sit down, have a coffee, and just build the thing.
If this is already helping your stack, you can buy the next round here:
XMR: 8Af3UaLLAc2c9A9gd9UFP3cqAXcmkkVMC4iDhU2xmW5xQuaNGUZVwRoLFToxpFmKcLjWKGtq6mmNYAoryDzEavHp4cfPQNf
BTC: bc1qgra7ulegx2kzyc67qw6qf5mct230273xv4eckd
Buy me a coffee or moreServer Configuration
Now we start with the final configuration of the node. Some OS basics, and then tor, bitcoind and monerod.
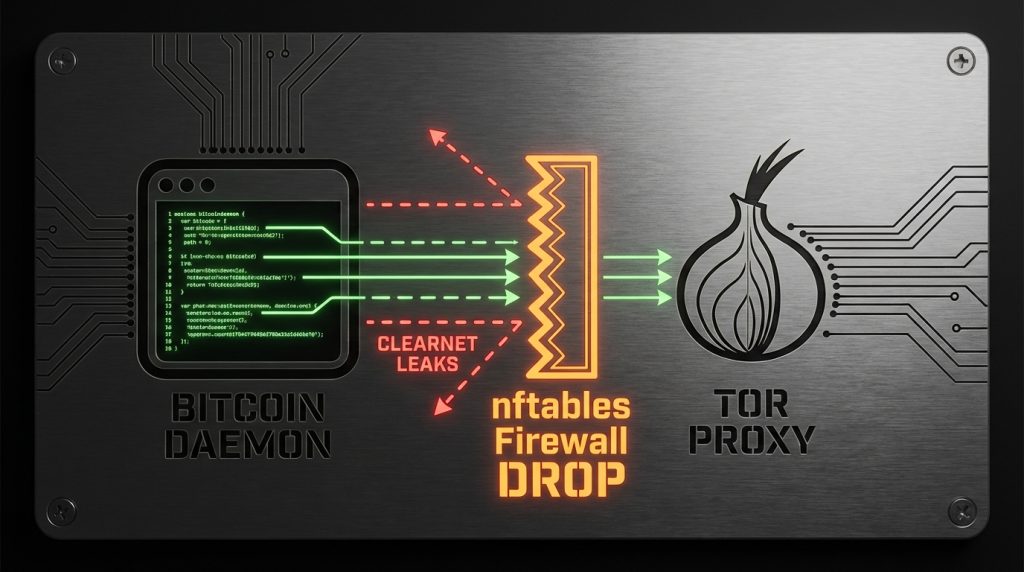
Essential Firewall Setup
As we are going to route all traffic via tor, we also want to make sure we do not spill any connections on clearnet, for that I am going to use nftables, the modern replacement of iptables.
Replace the contents of /etc/nftables.nft with the following
#!/usr/sbin/nft -f

flush ruleset

table inet filter {
    chain input {
        type filter hook input priority 0; policy drop;

        # Allow established traffic (replies to Tor/SSH)
        ct state established,related accept

        # Allow Loopback (Needed for SSH port forwarding and daemons -> Tor)
        iifname "lo" accept

        # SSH Access for wallet port-forwarding
        tcp dport 22 accept
    }

    chain output {
        type filter hook output priority 0; policy drop;

        # Allow all users to talk to the local Tor Proxy
        oifname "lo" accept
        ct state established,related accept

        # PERMIT: Tor daemon to connect to the Internet
        skuid "tor" accept

        # PERMIT: root Internet access - For system updates etc
        skuid "root" accept

        # Any other users like monero and bitcoin are getting
        # denied of Internet access here.
    }

    chain forward {
        type filter hook forward priority 0; policy drop;
    }
}
Lets verify the validity of the rules
nft -c -f /etc/nftables.nftThe previous command should produce no output if everything checks out.
run the following commands to add the firewall service by default on startup and load the firewall rules.
rc-update add nftables default
rc-service nftables restart
You can also verify that the rules are in effect by running
nft list rulesetNormally I use iptables on my servers especially when the ruleset is small, but I start now to use nftables regularly even for small setups like this for the sake of modernity. Though I have to admit using iptables for simple setups still looking fantastic to me.
SSH Daemon Configuration
Later on will require to do port forwarding between the node and the client, we need to change/add the following to /etc/ssh/sshd_config
AllowTcpForwarding yesNow restart sshd for the changes to take effect.
service sshd restartKernel Parameter Optimization via sysctl
By default, Alpine is tuned for lightweight containers. Here we expand the kernel’s limits to handle the massive memory mapping required by Monero’s database and the high connection overhead of the Tor network. The defaults will also work, but this is fine tuned for my old Macbook with 16GB RAM.
Append the following on /etc/sysctl.conf
# --- Virtual Memory Tuning ---
vm.swappiness = 10
vm.max_map_count = 524288
vm.overcommit_memory = 1

# --- Networking Stack (Local Loopback Focus) ---
net.core.somaxconn = 8192
net.core.netdev_max_backlog = 5000
net.ipv4.tcp_max_syn_backlog = 8192

# --- File Handles ---
fs.file-max = 2097152
Run the following command to apply the changes
rc-service sysctl restartSetting Up Tor
The setup of the tor service will only be used for outbound connections, no incoming, this way our node does NOT act as an entry, middle, or exit node for others.
There are two configuration files we need to edit. Replace the contents on each one of them with the configuration bellow.
File /etc/tor/torrc
SocksPort 127.0.0.1:9050
ControlPort 0

ORPort 0
DirPort 0
ExitRelay 0

CookieAuthentication 0

DataDirectory /var/lib/tor
Log notice file /var/log/tor/notices.log
RunAsDaemon 1
User tor
File /etc/tor/torsocks.conf
TorAddress 127.0.0.1
TorPort 9050

OnionAddrRange 127.42.42.0/24
Finally lets add the service to start on boot by default and start it as well
rc-update add tor default
rc-service tor restart
You can verify tor works as expected by running
doas -u bitcoin curl --socks5-hostname 127.0.0.1:9050 https://check.torproject.org/api/ipYou should see something like this:
{"IsTor":true,"IP":"XXX.XXX.XXX.XXX"}The Bitcoin Daemon
I specifically like to run the process in the foreground and manage it under tmux. Keep that in mind.
You will need to configure the RPC Authentication and provide a username and an encrypted password. You can download and run the python script from the bitcoin source git:
https://github.com/bitcoin/bitcoin/tree/master/share/rpcauth
Create the bitcoind.conf configuration file as user bitcoin. I use vim as the editor.
doas -u bitcoin vim /opt/bitcoin/bitcoind.confCopy/paste the following and make sure to replace the necessary parts
# [Storage]
datadir=/opt/bitcoin/data

# [Network: Tor-Only]
proxy=127.0.0.1:9050
onlynet=onion
listen=0
dnsseed=0
dns=0

# [Storage: Pruned]
# Target ~50GB (50,000 MB). Safe for a 256GB SSD.
# Always calculate an extra ~10GB from the prune value.
prune=40000
txindex=0

# [Logging]
debuglogfile=/opt/bitcoin/bitcoind.log
debug=tor
# Un-comment bellow for more debugging output
#debug=proxy
#debug=net
#debug=bench
shrinkdebugfile=1

# [Resources: Hardware Optimization]
# Increase dbcache to 2000 if you have 16GB RAM for faster sync
dbcache=2000
maxconnections=10
maxuploadtarget=100

# [Security: Local RPC Access]
server=1
# Bind to localhost for internal calls
rpcbind=127.0.0.1

# [Authentication]
# DO NOT USE PLAIN PASSWORDS.
# Generate your hash using the 'rpcauth.py' script from Bitcoin source
rpcauth=your_user:your_hash_string
This the only configuration we needed to do. We are ready to start the bitcoind daemon.
Run the following command under tmux
doas -u bitcoin bitcoind -conf=/opt/bitcoin/bitcoind.confNow give it a minute for bitcoind to establish its network and run the following so we make sure that our configuration correct and all traffic is properly routed via tor
netstat -anp|grep bitcoindYou should see something similar to the following
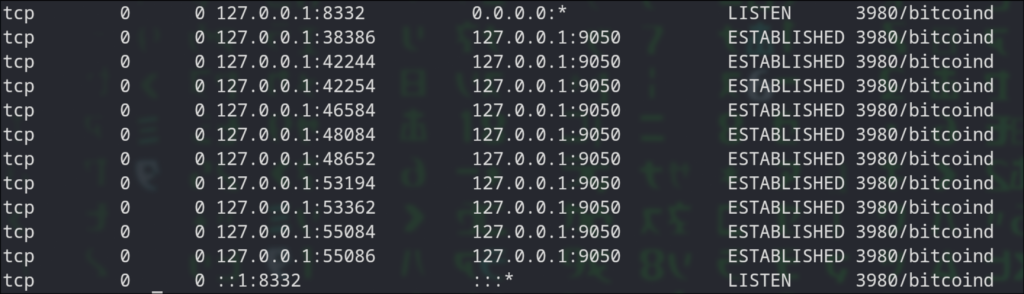
The Monero Daemon
Same with monerod, I run in the foreground and manage via tmux, so create a new panel/window and create the following file for editing
doas -u monero vim /opt/monero/monerod.confCopy/paste the following configuration
data-dir=/opt/monero/data
prune-blockchain=1
sync-pruned-blocks=1

tx-proxy=tor,127.0.0.1:9050,disable_noise
proxy=127.0.0.1:9050
no-igd=1
hide-my-port=1
p2p-bind-ip=127.0.0.1

rpc-bind-ip=127.0.0.1
confirm-external-bind=1
restricted-rpc=1
# Enter a username and a password in cleartext
rpc-login=your_username:your_cleartext_password

max-concurrency=2

log-level=0

log-file=/opt/monero/monerod.log

max-log-file-size=104857600
max-log-files=2


ban-list=/opt/monero/ban_list.txt
enable-dns-blocklist=1
The next step is to download the spy node ban list, this is for increasing our privacy. You can read more about it on this r/Monero reddit post and use the links there to download list. After that save it as /opt/monero/ban_list.txt.
Now start the monerod daemon with the following command
doas -u monero monerod --config-file /opt/monero/monerod.confWe now going to test that all connections are going via tor the same way we did with bitcoind.
Run the following
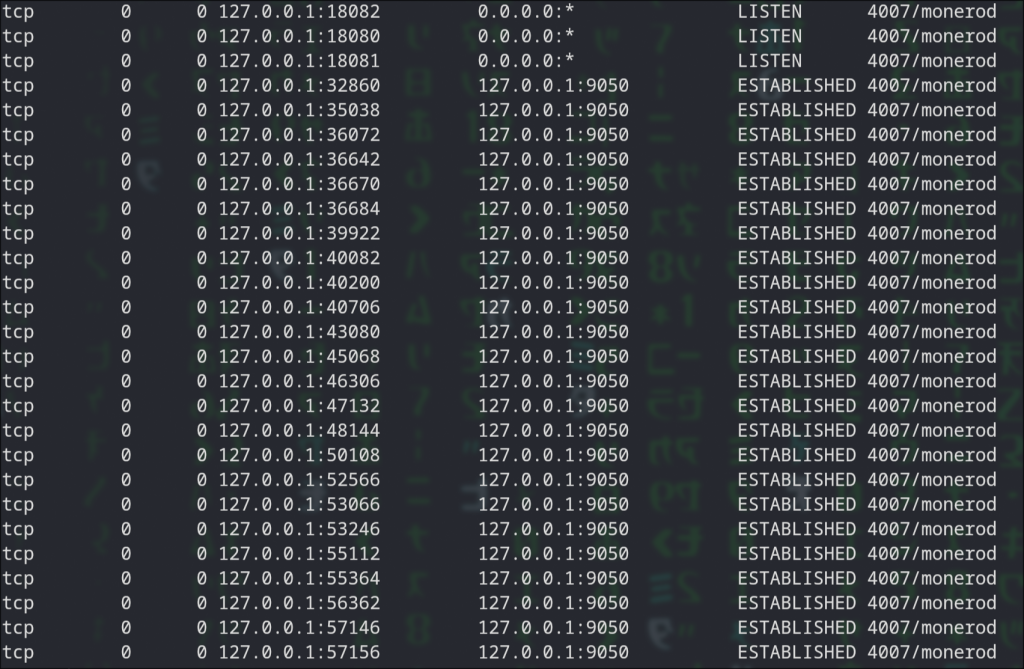
netstat -anp|grep monerodYou should see something similar to the following
Client Setup
So far we have finished setting up the server side and now its time to move to the client part.
We are going to connect our wallets to our nodes via SSH port forwarding, this is the most direct and secure method to do it, the alternative requires either transmitting data in clear text or managing certificates, a complexity that increases the attack surface and operational overhead.
As I am using Artix Linux, the setup is going to reflect on that. Commands will work on Arch and any other Arch based Linux distribution.
Setup SSH Port Forwarding
Assuming that we will connect to the node computer with a simple user, first I create a new SSH key for connecting to the node with the ssh-keygen command.
Lets further assume the SSH key is named “crypto-tunnel” and its already enabled for to login to the node.
I edit the ~/.ssh/config file on my local computer and I append the following (make sure you replace with your own LAN IP of your node and username)
Host crypto-tunnel
    # Private IP of your node
    HostName X.X.X.X
    User remote_username
    # The Identity File
    IdentityFile ~/.ssh/crypto-tunnel

    # Forwarding the necessary ports
    LocalForward 18081 127.0.0.1:18081
    LocalForward 8332 127.0.0.1:8332

    # Keep Alive (Critical for background tunnels so they don't drop)
    ServerAliveInterval 60
    ServerAliveCountMax 3
Now I execute the following command on the local computer to install the autossh package that will help us to automate the port-forwarding process.
pacman -S autosshNext, lets enable the port-forwarding, run the following
autossh -M 0 -f -N crypto-tunnelNow lets verify it works. Enter the following command
netstat -tulpn | grep -E '8332|18081'You should get something like the following

Wallets Setup
As I mentioned in the beginning I am going to use use Sparrow Wallet for Bitcoin and the official Monero GUI Wallet. I decided to use Sparrow Bitcoin Wallet as it does not require any extra setup on the Bitcoin node, it just uses TCP port 8332 to connect directly to bitcoind.
Monero GUI Wallet
On Artix it is readily available, execute first the following command to install it
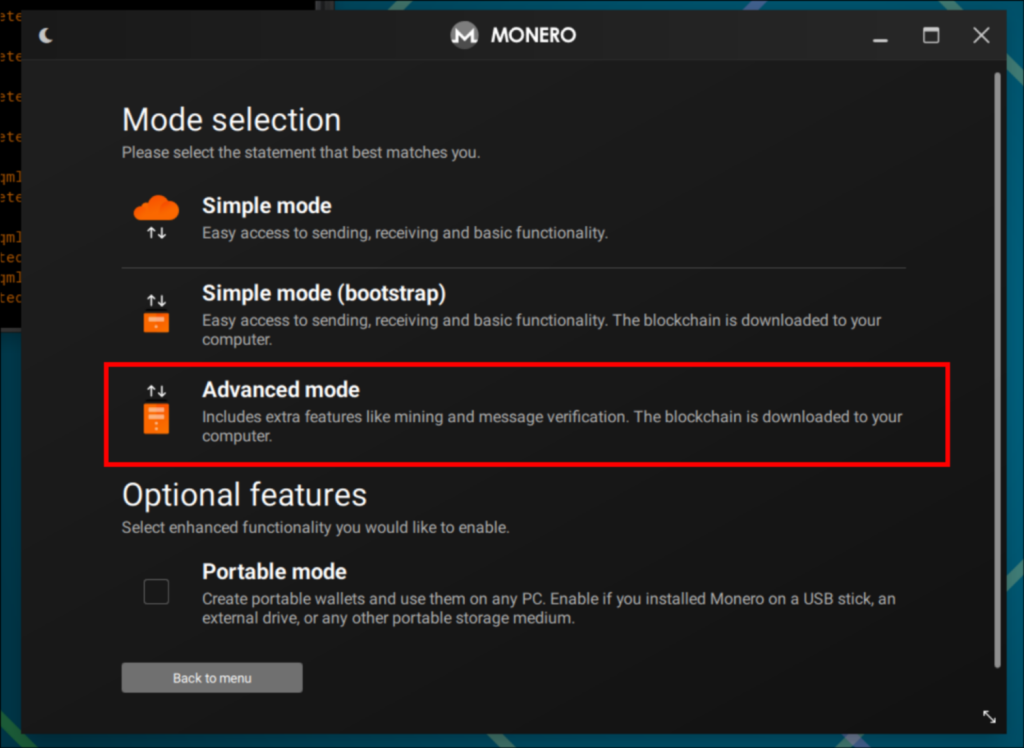
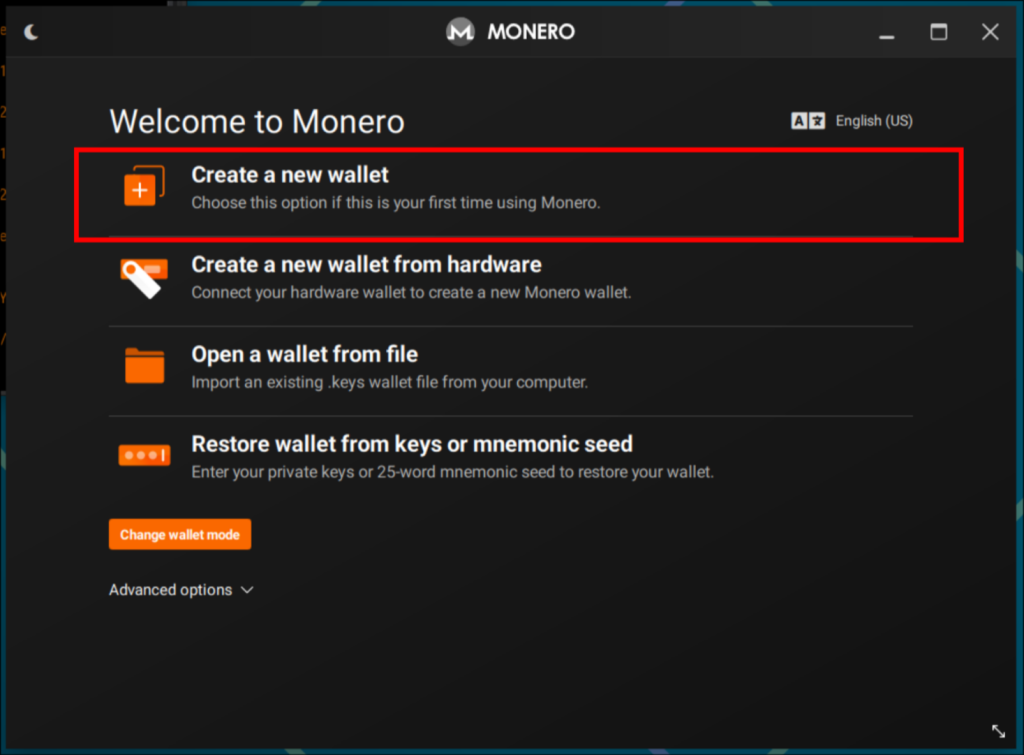
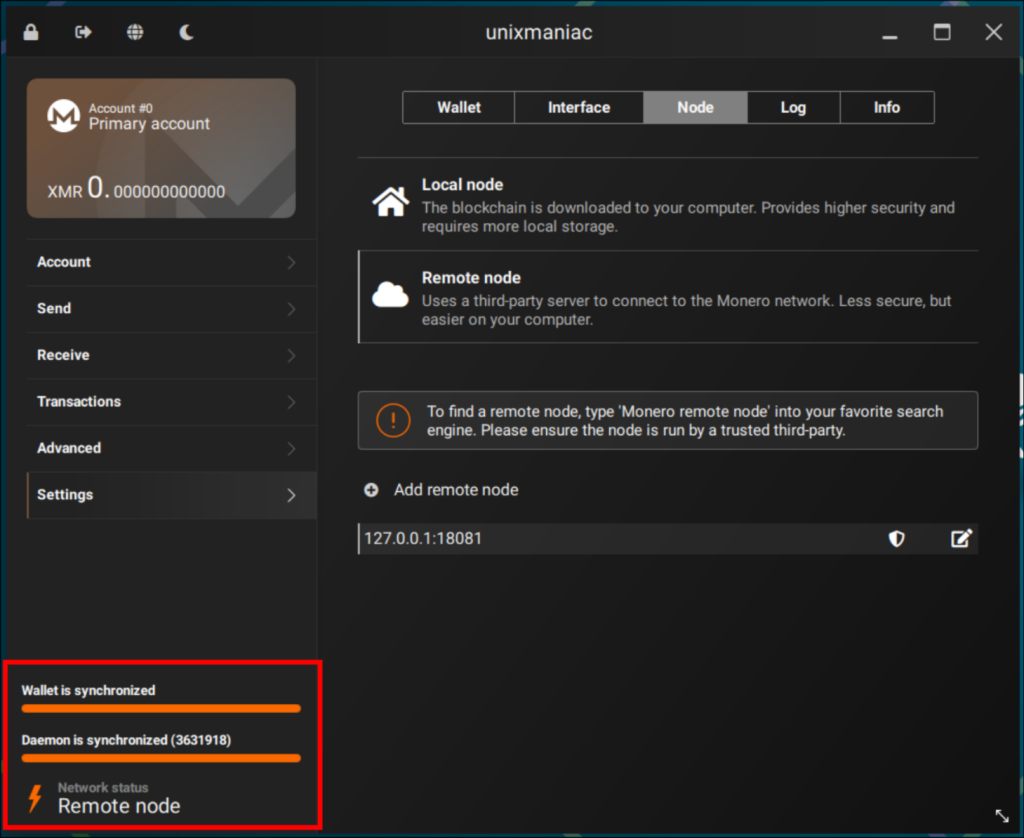
sudo pacman -Sy monero-guiWhen it starts the first time we need to configure it to connect to monerod. Follow the next steps:
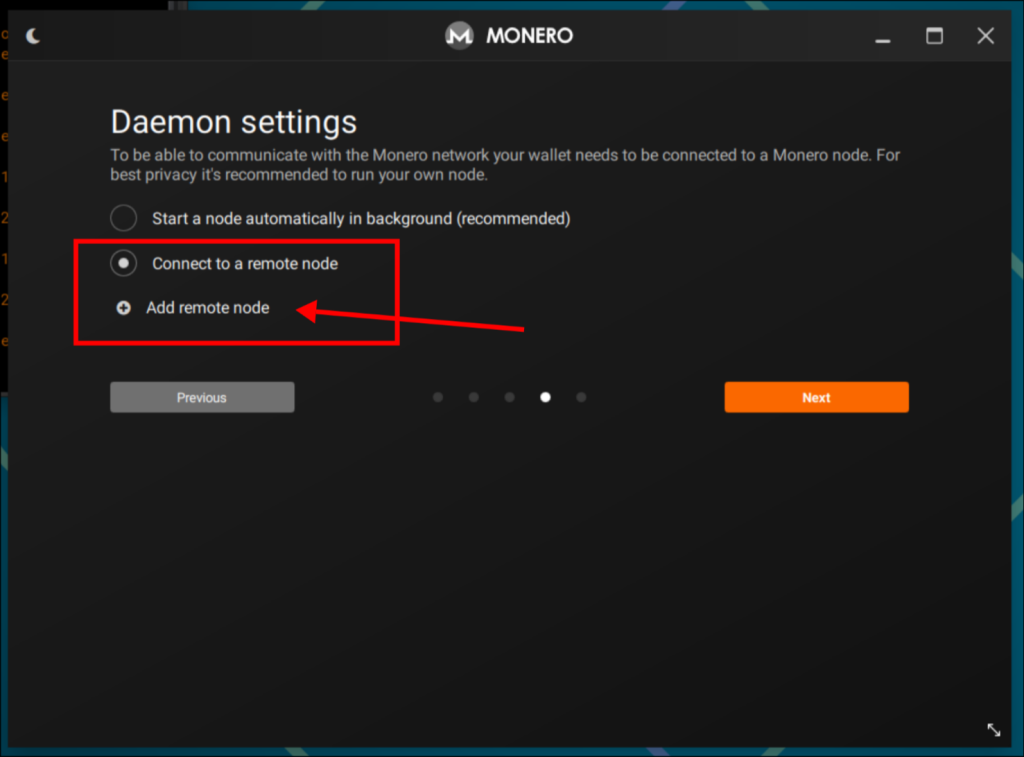
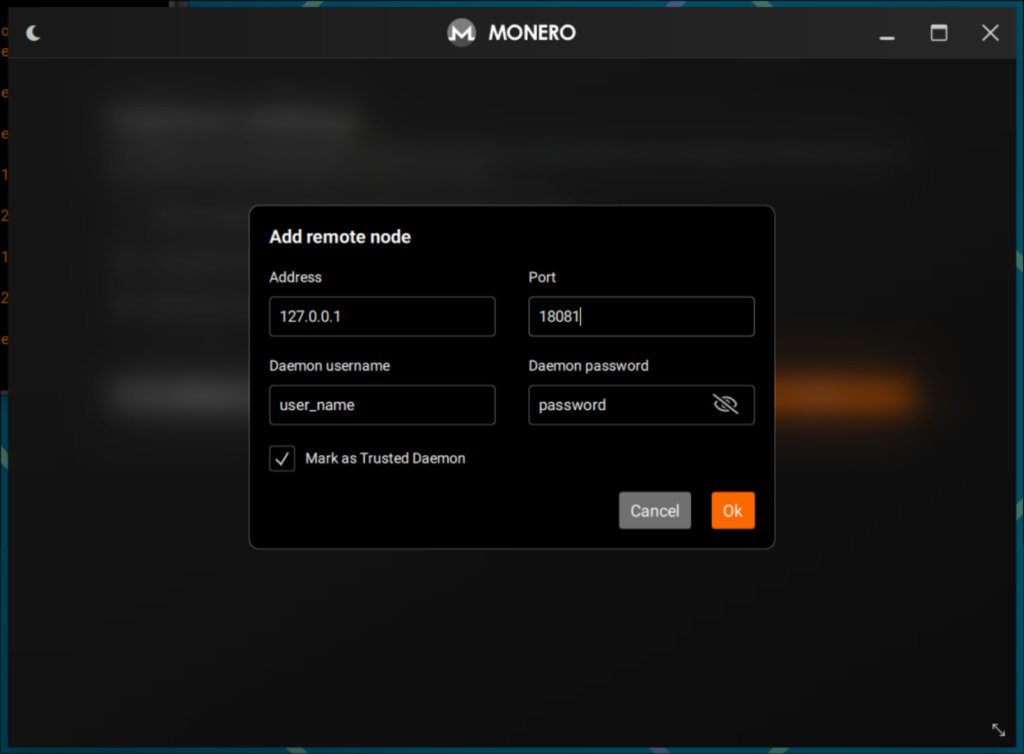
monerod.conf and select the option “Mark as Trusted Daemon” then click OK.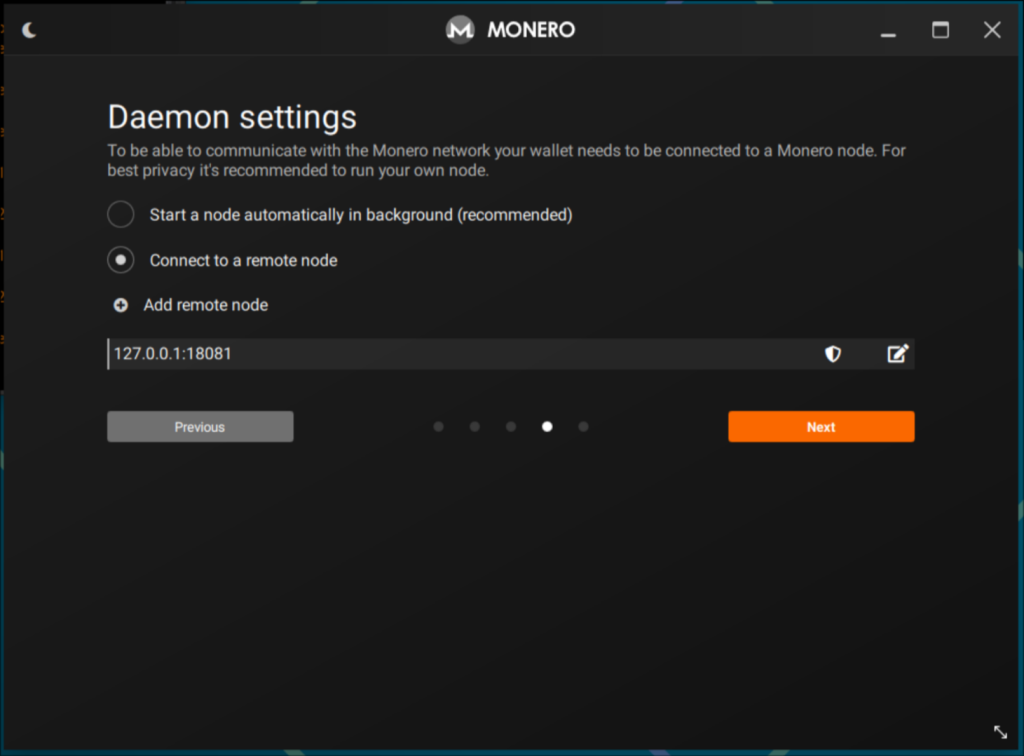
Sparrow Bitcoin Wallet
To install sparrow on Artix Linux we will have to use AUR and the yay utility.
Make sure yay is installed and run
yay -S sparrow-walletLaunch Sparrow Wallet and follow these steps to interface it with the local bitcoind node:
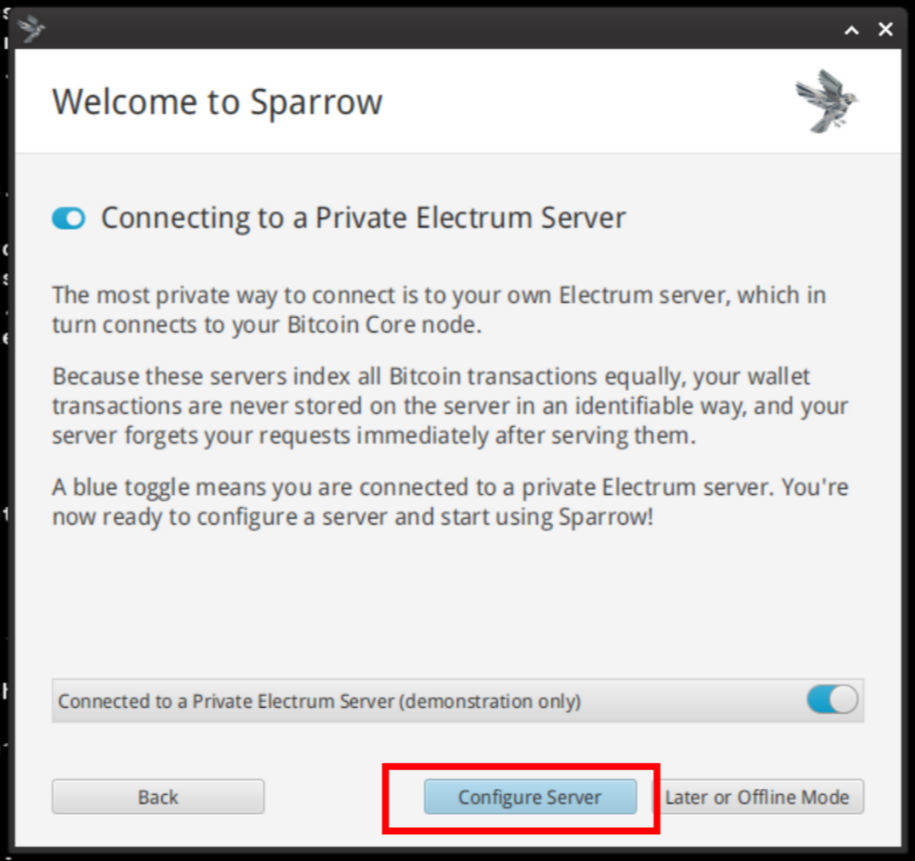
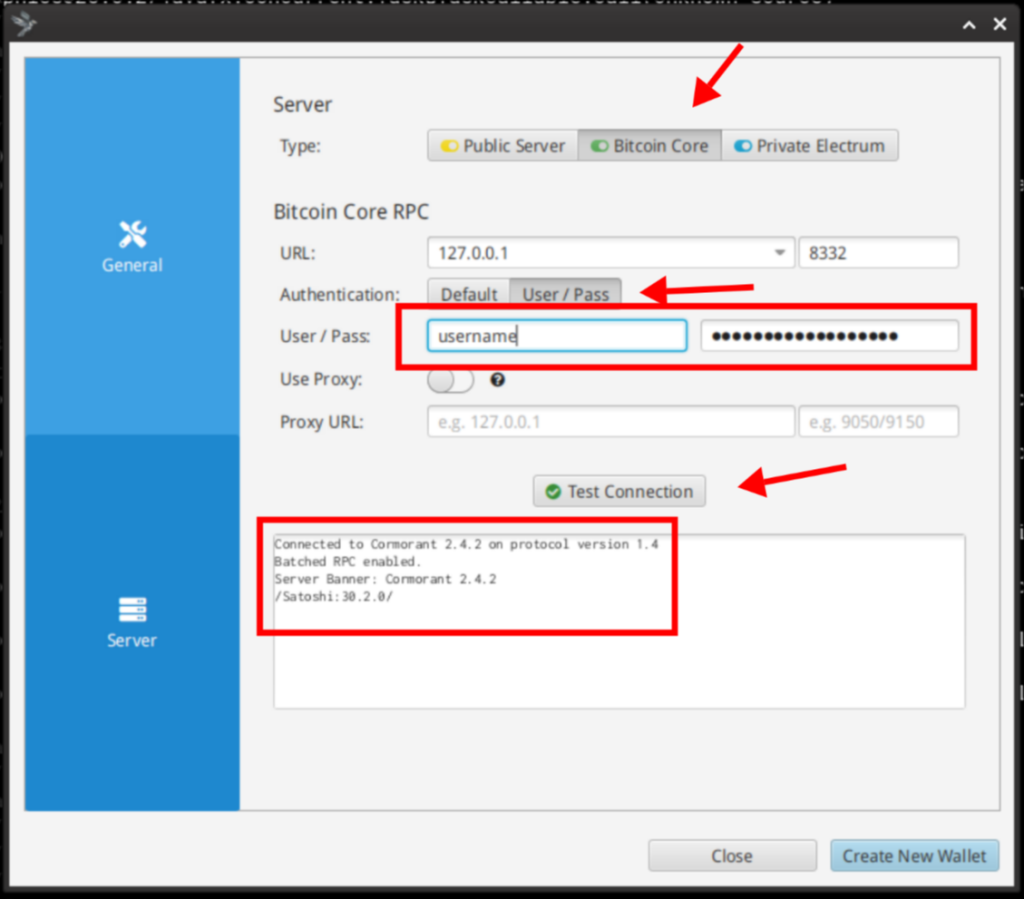
bitcoind.conf. Next Click on “Test Connection“, you should see a message similar to the one appearing on the image.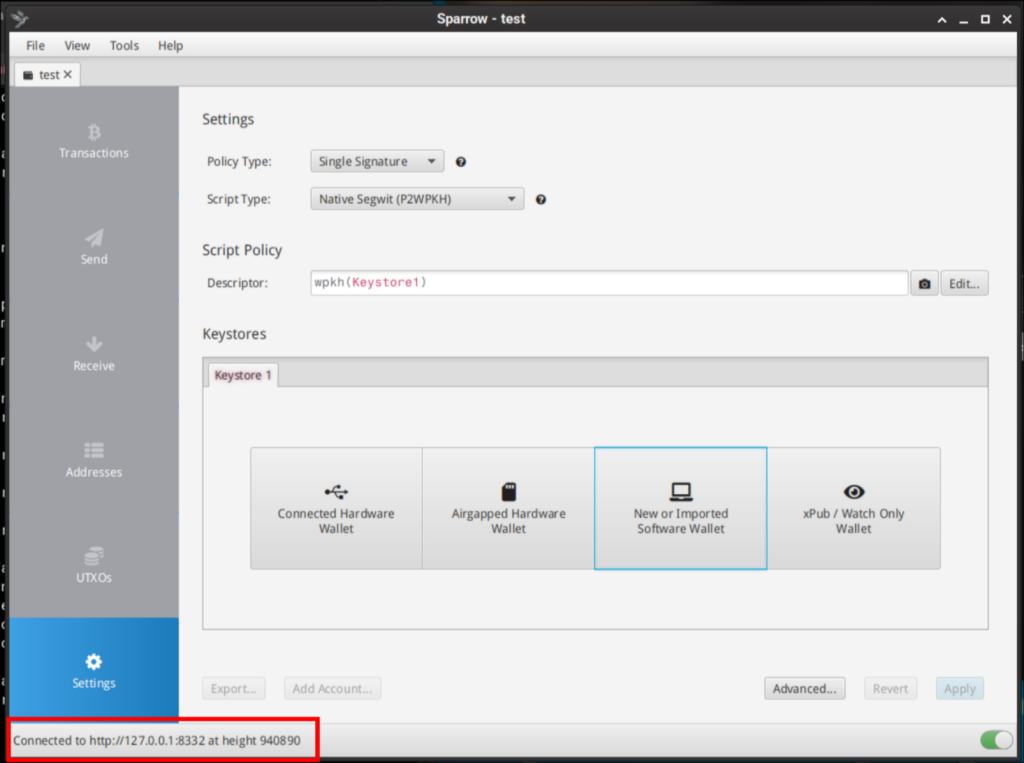
Final Notes
If you followed this guide to this point, same as myself, you now have a fully functional and bulletproof Bitcoin and Monero node in your internal network, ready to serve YOU, with all outbound traffic routed anonymously via the Tor network, ensuring the public IP remains masked.
I would also like you to consider supporting Monero and Bitcoin network by running a Full Node and accepting network connections from other nodes via Tor, this provides us the opportunity to contribute and help secure the future of both projects.
There are few more things that I would like to briefly add on this guide, normally they will require a separate future post.
Converting anonymously between BTC and XMR.
Maintaining a sovereign stack often requires shifting liquidity between BTC and XMR. In my experience, the only bulletproof way to perform this without compromising the perimeter is to use non-KYC exchange services over Tor.
My preferred workflow involves using ChangeNow (via Tor). The process is login-free: I define the destination address, deposit the assets into the ephemeral address generated for the session, and the service routes the converted funds to my pre-defined wallet. This maintains the anonymity of the stack, as the only link is my initial BTC address. By moving later on the resulting XMR to a secondary wallet, I effectively vaporize the transaction trail, making tracking impossible.
I write these guides the same way I would help a friend in real life: we sit down, have a coffee, and just build the thing.
If you enjoyed the session and it helped your stack, you can buy the next round here:
XMR: 8Af3UaLLAc2c9A9gd9UFP3cqAXcmkkVMC4iDhU2xmW5xQuaNGUZVwRoLFToxpFmKcLjWKGtq6mmNYAoryDzEavHp4cfPQNf
BTC: bc1qgra7ulegx2kzyc67qw6qf5mct230273xv4eckd
Buy me a coffee or more